Start-to-finish guide
Takeoff quickstart
Load plans, set scale and measure trade work. Organise folders and panes, add notes and photos, review assembly calculations and revisions, then price the quantities, insert them into a quote and export your work.
Getting in
A takeoff is the measured bridge between a drawing and priced work.
Start a standalone takeoff
Purpose: Use a standalone takeoff when you need to measure before a quote or job exists. It stays in Plans & takeoffs and can create a quote later.
- Open Plans & takeoffs from the app navigation.
- Give the takeoff a job-specific name, choose a PDF, JPG, PNG, WebP, GIF, BMP, SVG or DXF plan, then select New takeoff.
- Both the name and plan are required. This prevents empty, unidentifiable takeoff shells.
Worked example: For ABC Pty Ltd, use “Footscray landscape works” and the Footscray site-plan PDF. The list then becomes the durable home for this measured work.

Open from a quote when the customer is already known
Purpose: A quote-linked takeoff keeps the measured rows attached to that quote, so Insert to quote can add reviewed quantities without retyping.
- Open the ABC Pty Ltd quote, then open its takeoff workspace.
- Confirm the header shows the quote number before measuring.
- Use standalone for early estimating; use quote-linked when the commercial record already exists.
Worked example: The seeded example is quote Q-1001, “Footscray landscape package,” for ABC Pty Ltd.

Loading plans
Load the full plan set, keep sheet identity visible and replace only with intent.
Understand the plan set
Purpose: Plan tabs separate files; page controls move through sheets inside the active PDF. Keeping both levels visible prevents measurements landing on the wrong revision.
- Upload the real plan PDF. AllQuote stores it, opens page 1 and keeps the original drawing available for rendering and true-scale export.
- For a multi-page PDF, use Previous and Next beside the Page n / total label. Each page keeps its own scale and measurements.
- Use + beside the plan tabs to add another plan or select one already in the vault.
- Open File to upload a replacement. Removing or replacing is explicit because deleting a plan that carries measurements can also remove those page placements.
Worked example: The example set combines the genuine Footscray and Toolern Waters fixture drawings as two PDF pages, plus a separate revision tab.
Watch for: Before replacing a drawing, save, check the filename/revision, and confirm whether existing measurements must remain with the old sheet.

Setting scale — do this before measuring
Nothing length-, area- or volume-based is trustworthy until every measured page has the right scale.
Treat No scale as unfinished setup
Purpose: The ribbon state and amber banner make an uncalibrated page impossible to mistake for a measured one. Markup can exist, but quantities and pricing need scale.
- Check the scale button in the second ribbon row. No scale means the current page has no metres-per-pixel calibration.
- Use Set scale in the banner or the ribbon scale button before drawing trade quantities.
- After calibration, the live state changes to a value such as 1:100.
Worked example: A 100 px line must not be treated as 5 m, 10 m or 20 m until the sheet establishes that conversion.

Choose the right scale method
Purpose: The Scale panel puts four safe paths in one place: preset sheet scale, one-page detection, all-page detection and two-point calibration.
- Use a preset only when the printed title block and actual uploaded sheet size agree.
- Scale selects ratios such as 1:50 or 1:100; Sheet selects ISO A/B paper size. Both are required because the same ratio on different sheet sizes produces different pixel conversions.
- Waste default is a quantity allowance applied later; it is not part of calibration.
Worked example: Choose the scale and sheet size printed on your drawing. The detected Footscray example proposes B1 at 1:150; verify a known dimension before accepting it. The worked quantities elsewhere in this guide use separate demonstration calibration.

Detect one page, then review the suggestion
Purpose: Detect scale reads the active page’s PDF text first. It proposes a ratio and sheet; it does not silently rewrite the page.
- Select Detect scale on the page you are viewing.
- Compare the detected ratio and sheet with the title block.
- Apply to this page when only this sheet is confirmed; use the wider actions only when the other pages truly share it.
Worked example: If the result proposes 1:100 @ A1, check it against the title block and a printed dimension. If no reliable suggestion appears, calibrate manually.

Review mixed-size sets page by page
Purpose: Detect scale (all pages) is faster for a set, but the review panel protects mixed A1 drawings and A3 details from one bulk assumption.
- Select Detect scale (all pages). The fast pass reads embedded PDF text on the device.
- Review every checkbox and its source. Accept selected applies only checked, dimension-ready suggestions; Accept all applies every valid result; Skip all changes nothing.
- Mixed-size PDFs need per-page calibration even when their drawing ratios look similar.
Worked example: For a set containing an A1 1:100 sheet and an A3 1:50 detail, accept each only when its suggestion matches the drawing. Calibrate any unresolved page manually.

Use OCR only when PDF text has no answer
Purpose: Scanned drawings contain pixels rather than searchable title-block text. OCR is the slower fallback and asks permission because it takes extra processing time.
- When the text pass finds no scale, read the Try OCR? message and estimated time.
- Choose Run OCR to scan only title-block corners, or Cancel and calibrate manually.
- If OCR is unavailable, nothing is applied: use the printed dimension workflow instead.
Worked example: Read the estimate actually shown for your plan. Manual calibration may be quicker when a reliable printed dimension is visible, especially if OCR is unavailable.

Calibrate from a known distance
Purpose: Two-point calibration is the most reliable fallback because it uses geometry printed on the drawing rather than a title-block guess.
- Choose Calibrate two points, then click the two ends of a clear printed dimension.
- Enter the real distance and select m or mm. Use the same endpoints as the dimension line, not the text box edges.
- Apply scale, then use Ruler on a second known dimension as an independent check.
Worked example: For a drawing with a verified 10,000 mm reference, enter 10000 mm and check a separate known dimension. The screenshot demonstrates distance entry; it does not prove the example plan's calibration.
Watch for: A short reference magnifies clicking error. Prefer the longest clean printed dimension on the page.

Bulk-apply only after proving pages match
Purpose: Apply to... copies the current, reviewed calibration without pretending every page in a set is identical.
- Calibrate the active page first, then choose Apply to....
- Use All pages in this plan only for genuinely same-size/same-scale sheets; use All plans only when every loaded drawing matches.
- Use Selected pages for a controlled subset and read each page’s existing scale label before applying.
Worked example: For example, if pages 1 and 3 are verified A1 sheets at 1:100, apply that calibration only to those pages; leave an A3 1:50 detail unchanged.

Let the first-measurement guard stop a bad start
Purpose: If a scale-dependent tool is used on an uncalibrated page, AllQuote opens scale setup and keeps the intended action ready rather than banking a meaningless quantity.
- If the Scale panel opens on your first line, area, pipe, pitch, volume, ruler or smart measurement, stop and calibrate.
- After setting scale, return to the same tool and complete the measurement.
Worked example: Starting a pipe run on Page 2 with No scale produces “Set this page’s scale before measuring” instead of a fabricated metre quantity.

Measuring
Choose the measurement that matches the trade quantity, finish it deliberately and correct geometry before pricing.
Know what each core tool is for
Purpose: Different trade quantities need different geometry: counts for fixtures, lines for runs, areas for finishes and volumes for depth-based work.
- Marker counts individual fixtures such as outlets, downlights or trees.
- Line measures straight or chained runs such as cable, pipe, skirting or trench. Click each change of direction; right-click or Finish/Enter banks the chain.
- Area traces floors, paint zones or paving. Click corners in order; right-click, Finish/Enter, or click the first node when that control is enabled.
- Pitched area adjusts a roof footprint for slope. Volume multiplies a traced area by depth. Wall uses run × height. Ruler checks a distance without adding a ledger row.
- Choose Line, open Other sources, then choose Smart piping. Select a saved tubing pack and confirm before drawing pipe runs. Cancel leaves the takeoff unchanged. Finish the chain with right-click or Finish.
- Choosing a measurement tool opens a fresh picker for that geometry. Search the Project materials tab, or open Other sources for pricebooks, assemblies and, for linear runs only, Smart piping. Draw unassigned stays available in either tab. The previous cable or pipe material is not carried into the new tool.
- To continue measuring deliberately into one material, use that material's Measure action. Smart piping is available for pipe runs rather than unrelated area or count measurements.
Worked example: The worked trade uses Line for 18.40 m of 20 mm copper, Area for 42.60 m² of paving, and Marker for 6 garden lights.

Read geometry and labels together
Purpose: Coloured overlays show exactly where quantities came from; labels make the calculation auditable against the live ledger.
- Pan and zoom until endpoints align with the drawing, not nearby labels or hatching.
- Check each displayed quantity after finishing it. If a chain overshoots, select it and edit points before mapping a price.
- Keep logically different work in separate materials even when the geometry type is the same.
- Select an unallocated measurement and choose Assign material to link that individual shape or run. Review the resulting quantity and rate in the ledger.
- Smart piping matches each pipe corner's deflection (how far the run turns) to the nearest bend its tubing set stocks, within the team angle tolerance (5° unless changed). An amber pipe-corner warning names the drawn deflection, the fitting it is estimated as, and the bend angles the set stocks. The corner is still priced as that nearest fitting, so link the right bend or adjust the run.
- Pipe angles read as deflection, for example "60° bend". While you draw, the corner you are forming shows its angle. Select or hover a run to label its bends and see where stock lengths join; hovering a straight shows its length and how it is bought, such as "12.4 m · 2 × 5 m + 2.4 m cut". An estimated corner is labelled in amber and a corner with no stocked fitting in red, even when nothing is selected, and the ledger marks those rows ESTIMATE or NO STOCKED FITTING. Settings > Show every bend angle labels every bend; it is your own view setting and does not change the drawing.
Worked example: The example shows an 18.40 m copper run, a 42.60 m² paving area, a 12.80 m edging line and six garden-light markers on the real Footscray drawing.

Correct mistakes at the source
Purpose: Editing the geometry keeps every downstream quantity and price consistent; typing around a bad quantity only hides the error.
- Select a measurement, then right-click it. On touch, long-press.
- Use Edit points / properties to move vertices or change measurement settings; Duplicate only for genuinely repeated geometry.
- Use Add deduction / Apply as deduction for holes, Convert to pitched area for a roof face, or Delete and redraw when the shape is not salvageable.
- Undo and Redo cover recent actions; Save after the correction and recheck the ledger quantity.
Worked example: If the paving polygon includes a 3.20 m² garden bed, add it as a deduction so the net area—not the gross traced box—reaches the price.

Assigning materials
A drawing becomes quote-ready only when each placement belongs to a meaningful material row.
Turn placements into material ledger rows
Purpose: Materials give geometry a trade meaning; the ledger aggregates placements into quantities that can be priced and transferred.
- Choose a drawing tool and use its material picker, or use Add materials in the Materials pane or folder menu. Choose a pricebook item or assembly when ready to price, or Draw unassigned to measure first. Use a material's Measure action to continue drawing into that material; open its settings to edit it.
- Use folders to organise materials. Drag a folder onto another folder to nest it, or onto Folders · top level to move it out. For several materials, choose Select materials, tick the rows, then Move to folder. Folders do not change measurement types or pricing.
- Open Appearance & trade to choose colour, a visual marker and trade tags. Assign trades uses checkboxes for several trades; drawing views hide markings on screen without excluding work from quantities or quotes.
- Choose Done to save material settings. X or Escape discards edits made in that settings window. Wait for confirmation if a save is still running.
- Layers/build-ups let one measured object feed several material or assembly layers using the same exact quantity.
- Unallocated materials are geometry without a finished material assignment. Resolve them before quote insertion so no work disappears into a generic row.
- Organise & setups also contains Page view, Save setup and Load setup. Leave Page view off to see materials across the whole takeoff.
- Deleting a material removes its placements on every page. Undo restores those placements across the plan set; Redo removes them again.
Worked example: The 42.60 m² paving placement belongs to Paving—Supply & lay; the six points belong to Garden lights; the 18.40 m line belongs to 20 mm copper pipe.

Pricing: Select Linked Item
Prefer maintained pricebook items or assemblies; use a visible manual price only when that is genuinely the best source.
1. Link a priced item
Purpose: A linked item follows the maintained pricebook or assembly, keeping supplier/source context and sell rate visible when the takeoff changes.
- On a line or marker ledger row, choose Select Linked Item or Change linked price.
- Search at least two characters, then switch between Pricebook and Assemblies as needed.
- Read Item name, Supplier, Pricebook, Unit and Sell price together. The unit must match the measured row: m for a run, each for a marker, m² for an area.
- Not priced means a row still needs a price. Priced total includes only priced work; resolve any incomplete-price or missing-scale notice before relying on the total.
- Use Supplier, Pricebook, Category, Unit and price filters to narrow a large catalogue, select the correct row, then Link selected price.
Worked example: Link the 18.40 m copper line to “Copper tube 20 mm” at $14.80/m: 18.40 × $14.80 = $272.32 before GST. Link six light markers to the each-priced garden-light item.
Watch for: An each-priced item linked to metres is a unit mismatch. Fix the item or the material type before sending.

2. Use a Manual Price
Purpose: Manual Price is an intentional by-hand sell rate for a one-off allowance or unavailable catalogue item. It stays visibly reviewable instead of masquerading as maintained pricing.
- In the same linked-item dialog, enter the customer-facing description, unit, sell price and category.
- Choose Use Manual Price. The same path works for a line or marker; its unit must still match the measurement (m for the edging line, each for the bollard markers).
- Use a clear name that will make sense on the customer quote—never “misc” or a silent zero placeholder.
Worked example: Line example: 12.80 m of steel edging at a manual $22.00/m = $281.60. Marker example: six custom bollards at a manual $185.00 each = $1,110.00 before GST.

Follow the Manual Price - review badge
Purpose: The badge makes provisional pricing impossible to forget. It follows manual-priced work into the quote for a final commercial check.
- After pricing the steel edging line and custom bollard markers manually, confirm both ledger rows show Manual Price · review.
- Re-open the linked-price dialog to replace the manual rate with a maintained item when one becomes available.
- Before sending, review description, quantity, unit, sell price, margin and tax on every badged quote line.
Worked example: The 12.80 m edging allowance and six custom bollards remain visibly badged until someone confirms each rate or links a maintained supplier item.

Into a quote
Transfer reviewed quantity and pricing evidence, then perform the normal customer-document review.
Create or insert the quote lines
Purpose: The transfer removes retyping while preserving a clear review boundary before anything reaches the customer.
- From a standalone takeoff, choose Create quote. From a quote-linked workspace, use Edit > Insert to quote.
- Descriptions, measured quantities, units, linked/manual pricing and takeoff provenance carry across. The drawing itself remains in the takeoff.
- Review cost, sell price, margin, tax, wording and waste/rounding before finalising or sending - and re-check every price you entered by hand, since a Manual Price is your number, not a pricebook number.
Worked example: Copper tube transfers as 18.40 m × $14.80 = $272.32; paving as 42.60 m² × $96.00 = $4,089.60; the six bollards transfer as a $1,110.00 manual allowance. Subtotal: $5,471.92; GST: $547.19; total: $6,019.11.

Export
Export the mark-up on the original sheets and protect true scale at print time.
Export measurements and markups to PDF
Purpose: The export is a field/shareable drawing, not just a table: vector markups are placed on the original plan sheet with scale information.
- Save, then choose File > Export PDF (all trades, to scale). By default, sheets carrying measurements are exported.
- For the full quantity table, choose File > Export takeoff quantities to CSV (full ledger), or Export quantities to CSV in Ledger. This includes all pages and trades, including assembly component breakdowns; a filtered drawing view is not an export filter. Component breakdowns are already included in parent totals, so do not add them a second time.
- Each calibrated PDF page uses its original sheet size and gets a scale bar. Uncalibrated pages are marked NOT TO SCALE; an uncalibrated image cannot establish a true sheet size and is omitted.
- Print or plot at 100% / Actual size. Fit to page changes the physical drawing scale even though the exported scale bar remains a useful check.
Worked example: Export a sheet whose calibration you have verified, print at 100%, then confirm a known reference and the scale bar with an appropriate scale rule. Demonstration quantities are not evidence that a source drawing is correctly calibrated.

Troubleshooting and mobile use
Most takeoff failures are scale, source-plan or device-capacity problems; diagnose those before redrawing work.
Resolve the common failure modes
Purpose: The same page-specific scale safeguards remain available on a phone, while desktop is preferable for detailed tracing.
- No scale set: use the banner or scale button, calibrate, then verify a second known distance.
- Wrong scale detected: reject or skip the suggestion and use the correct title-block value or two-point calibration.
- Mixed-size sheets: calibrate each page separately; bulk-apply only within a proven same-size subset.
- OCR unavailable: use embedded text if present, otherwise manual two-point calibration. OCR failure never needs to block measuring.
- Plan too large or slow: wait for the page to finish rendering, close other memory-heavy tabs, work one plan at a time, or split an exceptionally large PDF without changing page size. Keep the original for export.
Worked example: On the 390 px view, Page 2 can still be set to A3 1:50 independently. Use desktop for point-perfect geometry, then mobile for review or a small correction.

Keep this guide beside the work
Purpose: The guide is designed to be readable in light or dark theme and at phone width, so it can remain a reference on site.
- Open Help > Takeoff quickstart from the takeoff command menu, or open it from the Guides page.
- Use the section links to jump directly to Scale, Measuring, Pricing or Troubleshooting.
- Use the illustrated examples as a reference; their sample quantities, prices and notes are not project specifications.
Worked example: Keep the guide open on a phone while reviewing the plan on desktop; the content stays in one column without horizontal page scrolling.

Organise, annotate and review
Use folders, personal panes and saved evidence to keep an estimate understandable as it changes.
Arrange folders and panes
Purpose: Keep the drawing clear while keeping the controls you need close at hand.
- Click a folder chevron to expand or collapse it. The folder icon changes with its state.
- Drag the folder heading to another folder. Follow the ghost and destination hint, then release to nest it. Drop on Folders · top level to move it out.
- Click a pane heading to collapse its content while keeping the heading visible. Right-click a heading to show or hide panes or move a pane left or right; drag pane dividers to resize.
- Use the Panes control to recover hidden panes. Layout choices are personal; they do not change the measured work.
Worked example: Keep Floors above a nested Bathroom folder, with Ledger on the opposite side of the drawing.
Watch for: Moving a folder into its own descendant is not allowed.

Link a folder to a visible sheet
Purpose: A page link is a shortcut to a drawing already loaded in the takeoff.
- Right-click the folder and choose Link to plan or photo page.
- Review the page thumbnails and labels, then select the intended sheet.
- Use the folder link to return to that sheet. Linking does not move or duplicate materials.
Worked example: Link the Bathroom folder to the bathroom detail rather than relying on its PDF page number.
Watch for: Check the sheet title and revision as well as the thumbnail.

Edit a material and assign trades
Purpose: Review settings as a draft before saving them.
- Open material settings, change its name, folder or measurement settings, and choose Select Linked Item when it needs pricing.
- Expand Appearance & trade to pick a marker by its icon and adjust its appearance.
- Choose Done to save. X or Escape discards the settings draft.
- For several materials, tick their checkboxes and choose Assign trades. Tick a trade to assign it to the selected materials, or clear it to remove that tag. A dash means only some selected materials currently use it. Choose Apply trades after reviewing the checkboxes.
Worked example: Tag a cable material Electrical and External works while keeping its linked price unchanged.
Watch for: A save error or uncertain result needs checking before retrying; closing is not proof that a save succeeded.

Place, edit and discuss annotations
Purpose: Use notes for plan context and discussion without changing quantities or prices.
- Choose Note and click the canvas. A default marker appears immediately. Double-click it to open the note pane; edit its text there and choose Save note.
- Move the Notes pane left or right through its pane menu. The drawing shows the marker; the pane holds the full text.
- Right-click the marker and choose Properties to change its shape or symbol, colours, opacity and size. With Select active, drag an annotation to move it or use its handles to resize it.
- Save note edits before adding attachments or comments. Drop files or photos into the pane, or choose files. Supported photos appear inline; other files remain available as attachments.
- Add a comment and choose Post comment. Comments & change history records the author, date and time; expand a change to inspect before and after values.
- Text starts where you place it. Use a text box when it should wrap to a chosen width; Ctrl+Enter saves the text. Use Select to drag it and resize its handles.
Worked example: Place a warning marker at a cable penetration, attach a site photo and post a dated question for the team.
Watch for: Cancel discards the note text draft but keeps a newly placed marker. Use Undo or Delete to remove that marker. Earlier edits may predate history tracking; posted comments and saved changes are retained.

Review saved versions and their impact
Purpose: Separate changes to the estimate from visual differences between drawing sheets.
- Use File > Save version... to label a checkpoint, then open Version history.
- Read the saved author and time. Compare a saved version with current work, or choose two saved versions.
- Review added, removed and changed markings, then expand the impact details for quantities, settings and pricing. Follow page links to inspect the changed work.
- Use drawing overlays separately to compare sheet geometry. Review the resulting quote changes before issuing a variation.
Worked example: Compare the original paving allowance with the revised footprint and check the added area and linked cost.
Watch for: A comparison explains stored changes; it does not automatically approve a design revision or issue a priced variation. Pricing impact uses captured priced rows and excludes unpriced work. Missing historical pricing is not a zero-price change.

Inspect live assembly quantities
Purpose: See which rule drives each component before saving an assembly.
- Open an assembly and expand its quantity logic. Enter a sample measurement and check the measurement unit.
- Edit an individual component formula or the whole-assembly quantity script. The visible preview updates as you edit valid inputs.
- Read the effective rule and follow raw quantity through waste, ordering multiples and purchased quantity. Compare the line prices and total.
- An enabled assembly script takes priority where it supplies a component result; otherwise the component formula or structured Qty / Per provides the fallback. Save assembly only after reviewing the preview.
Worked example: For 20 m² of tiling, check tiles, adhesive and labour independently before applying an ordering pack size.
Watch for: Live preview does not save the assembly. Avoid adding waste both inside a formula and again as an allowance.

Measure the turn in a line run
Purpose: Read the angle between two drawn straight segments without creating another quantity.
- Open Edit > Measure angle between lines, then click the first and second line segments.
- For joined segments, the readout shows the deflection, the inside angle and the outside angle, each labelled. Confirm the highlighted segments meet at the intended turn.
- Press Escape when finished and return to the measurement tool you need.
Worked example: A 45° deflection is a 135° inside angle and a 225° outside angle. Bends are named by deflection, so a 45° bend turns the run 45°.
Watch for: This tool only reads the drawn segments; it adds nothing to the estimate. Smart piping fittings are counted from the pipe runs themselves.

Reuse a measured room
Purpose: Place independent copies of a reviewed selection for repeated rooms or work packages.
- Select the measurements on one page, then choose File > Reusable rooms / repeated takeoff.
- Enter a template name and choose Save selected as template. Enable Available to this team only when it should be shared.
- Choose a saved room, rotation, copies, columns and spacing. Choose Place on drawing and click the intended origin.
- Check each placement against its room, page scale, materials and assemblies. Edit each copy’s geometry when its room differs; check shared material settings before changing a material used by several copies.
Worked example: Repeat a typical bathroom across a row, then adjust the accessible bathroom separately.
Watch for: Use the unit shown for spacing. A copied room still needs checking against the actual drawing; repeating a template does not establish identical scope.

Volume and advanced worked examples
Use these examples alongside the real application screenshots above. The dimensions and rates below are illustrative exercises. Manual plan takeoff is included with Takeoff, Business and Enterprise; check current plan availability.
Driveway volume: area × depth
Measure excavation, concrete or a paving base in cubic metres. Keep layers with different depths as separate materials.
- Calibrate the plan page and check a known dimension. Select Volume in the measurement toolbar, then trace the boundary and finish the polygon.
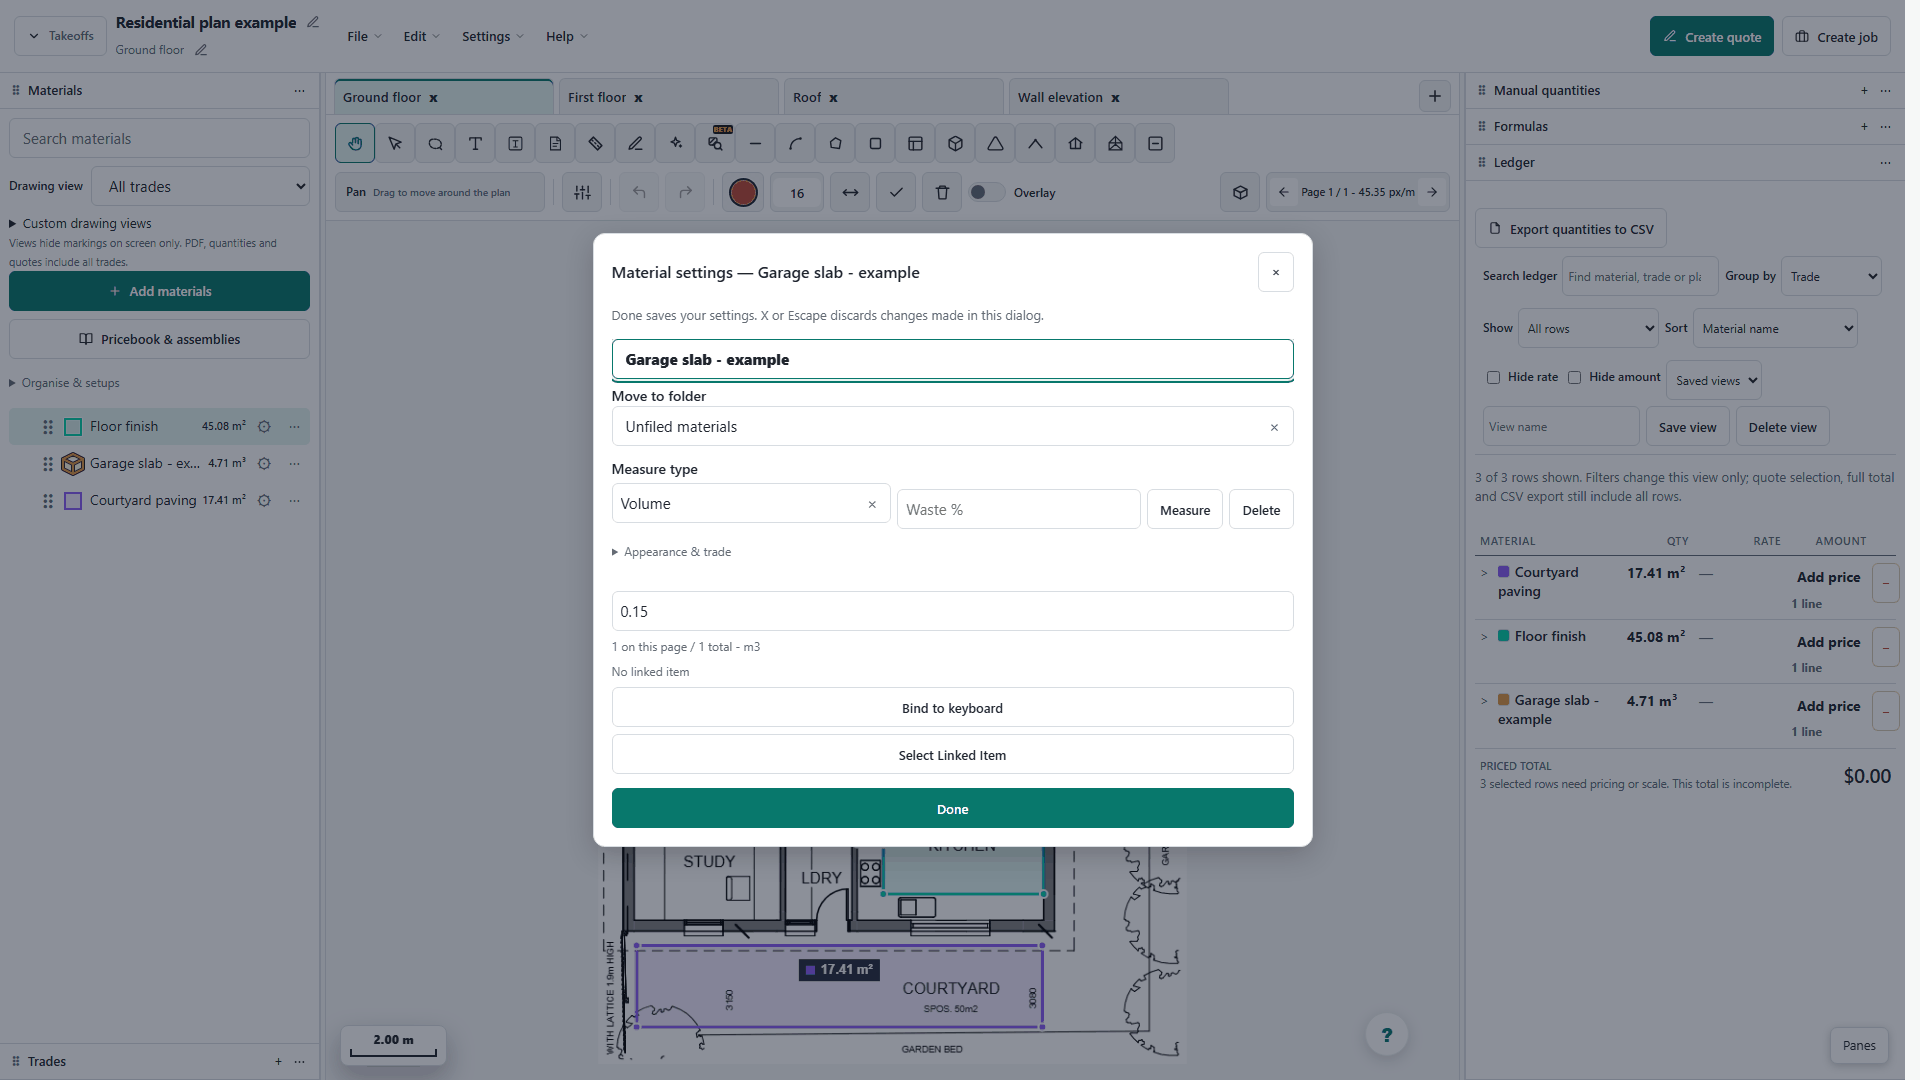
- For a new measurement, enter the depth in the Excavation / slab depth prompt and select Save. To review or edit an existing slab as pictured, open its Material settings, read the unit beside Depth, enter the specified value and select Done. The label follows the takeoff's selected measurement units. The screenshot uses metres: 150 mm is 0.15 m, not 150. With feet selected, the same depth is approximately 0.4921 ft.
- Check the material's depth and the ledger quantity in m³. Deduct excluded areas before calculating the material requirement. Split an area into separate measurements where depth changes; one depth does not describe a variable-depth excavation.
- Use a matching m³ price or assembly, then review the quantities inserted into the quote. Keep paving surface area in m² as a separate line from its base volume.
Worked example: A 100 m² driveway at 0.15 m depth is 15 m³. A separate 0.05 m bedding layer over the same footprint is 5 m³. If a 4 m² garden bed is excluded from both layers, the net 96 m² gives 14.4 m³ and 4.8 m³ respectively.
Check before quoting: These are illustrative dimensions, not a pavement design. Compaction, loose material, excavation bulking, delivery minimums and waste require separate project-specific allowances; geometric volume does not automatically include them.
Formulas: turn measured scope into another quantity
Use arithmetic and measured ledger references for a calculation you can inspect and reuse.
- Measure the source geometry, make deductions, and give the material a clear label such as Wall area. Check its net quantity before using it in a formula.
- Expand Formulas in the takeoff side panel and choose Add formula. Enter a Name, an Expression and the output Unit. Choose the source from Measured ledger labels and use Insert ref to avoid a misspelled reference.
- For an illustrative brick count, enter [Wall area] * 48.5 and use bricks as the unit. Select Save formula and compare the result with a hand calculation.
- Use Library to insert a reusable team formula. This inserts a copy; changing that copy does not change the shared library. Recheck the result after changing the source measurement and review any price and quote insertion separately.
Worked example: With Wall area = 20 m², [Wall area] * 48.5 gives 970 bricks. An explicitly chosen 5% allowance would be [Wall area] * 48.5 * 1.05 = 1,018.5 bricks before an ordering-rounding decision. The 48.5 factor is an example, not a universal brick coverage rate.
Check before quoting: Use supported arithmetic (+, −, ×, ÷ and parentheses; type * and / in the expression). Check the input and output units, avoid adding the same waste twice, and resolve missing-reference errors before quoting. A formula does not infer a structural design or select a compliant assembly for you.
![Enter [Floor finish] * 11 to calculate an illustrative tile count from measured area. Check coverage, waste and ordering rules before use.](/static/guides/img/takeoff-hazel/formula.png?v=30048c1a35aab8d5)
Assemblies: materials and labour from one measured quantity
Expand a reusable build-up into its component quote lines instead of pricing every component again.
- Prepare the assembly's material and labour components and choose the rate basis that matches the measured work, such as per m² for tiling. Check each component's quantity, buying unit and price.
- Expand quantity logic and edit the component formula or whole-assembly script. The visible preview updates as you type valid inputs; inspect the effective rule and raw-to-purchased quantity for each component.
- Review component waste, rounding multiples and pack quantities. Keep labour allowances separate from material waste, avoid including waste twice, and choose Save assembly after checking the live result.
- On the measured ledger row, choose Select Linked Item, switch to Assemblies, and select the matching build-up. Each is a fixed bundle; Per each scales with the measured count. Per-m² scales with measured area.
- Insert the reviewed work into the quote, then check the expanded quantities and prices for each component. Layers/build-ups can apply several components or assemblies to the same measured geometry; check that you have not included the same work twice.
Worked example: For a net 10 m² area, a per-m² assembly with 11 tiles, 0.25 adhesive bags and 0.5 labour hours per m² gives 110 tiles, 2.5 bags and 5 hours before waste. Whole-unit rounding configured for the adhesive gives 3 bags. Apply actual pack sizes and project rates before ordering or quoting.
Check before quoting: Check the basis again after changing a material's measurement type. Maintained pricebook components and free-text components have different price sources; a supplier update is not a promise that an issued customer quote will be rewritten.

Overlays: compare drawings and review the changed scope
Align plan sheets to inspect changes or relationships between floors, then update the affected estimate deliberately.
- Load the comparison drawing as another plan and confirm its sheet identity, revision and scale. Keep the original drawing available for comparison.
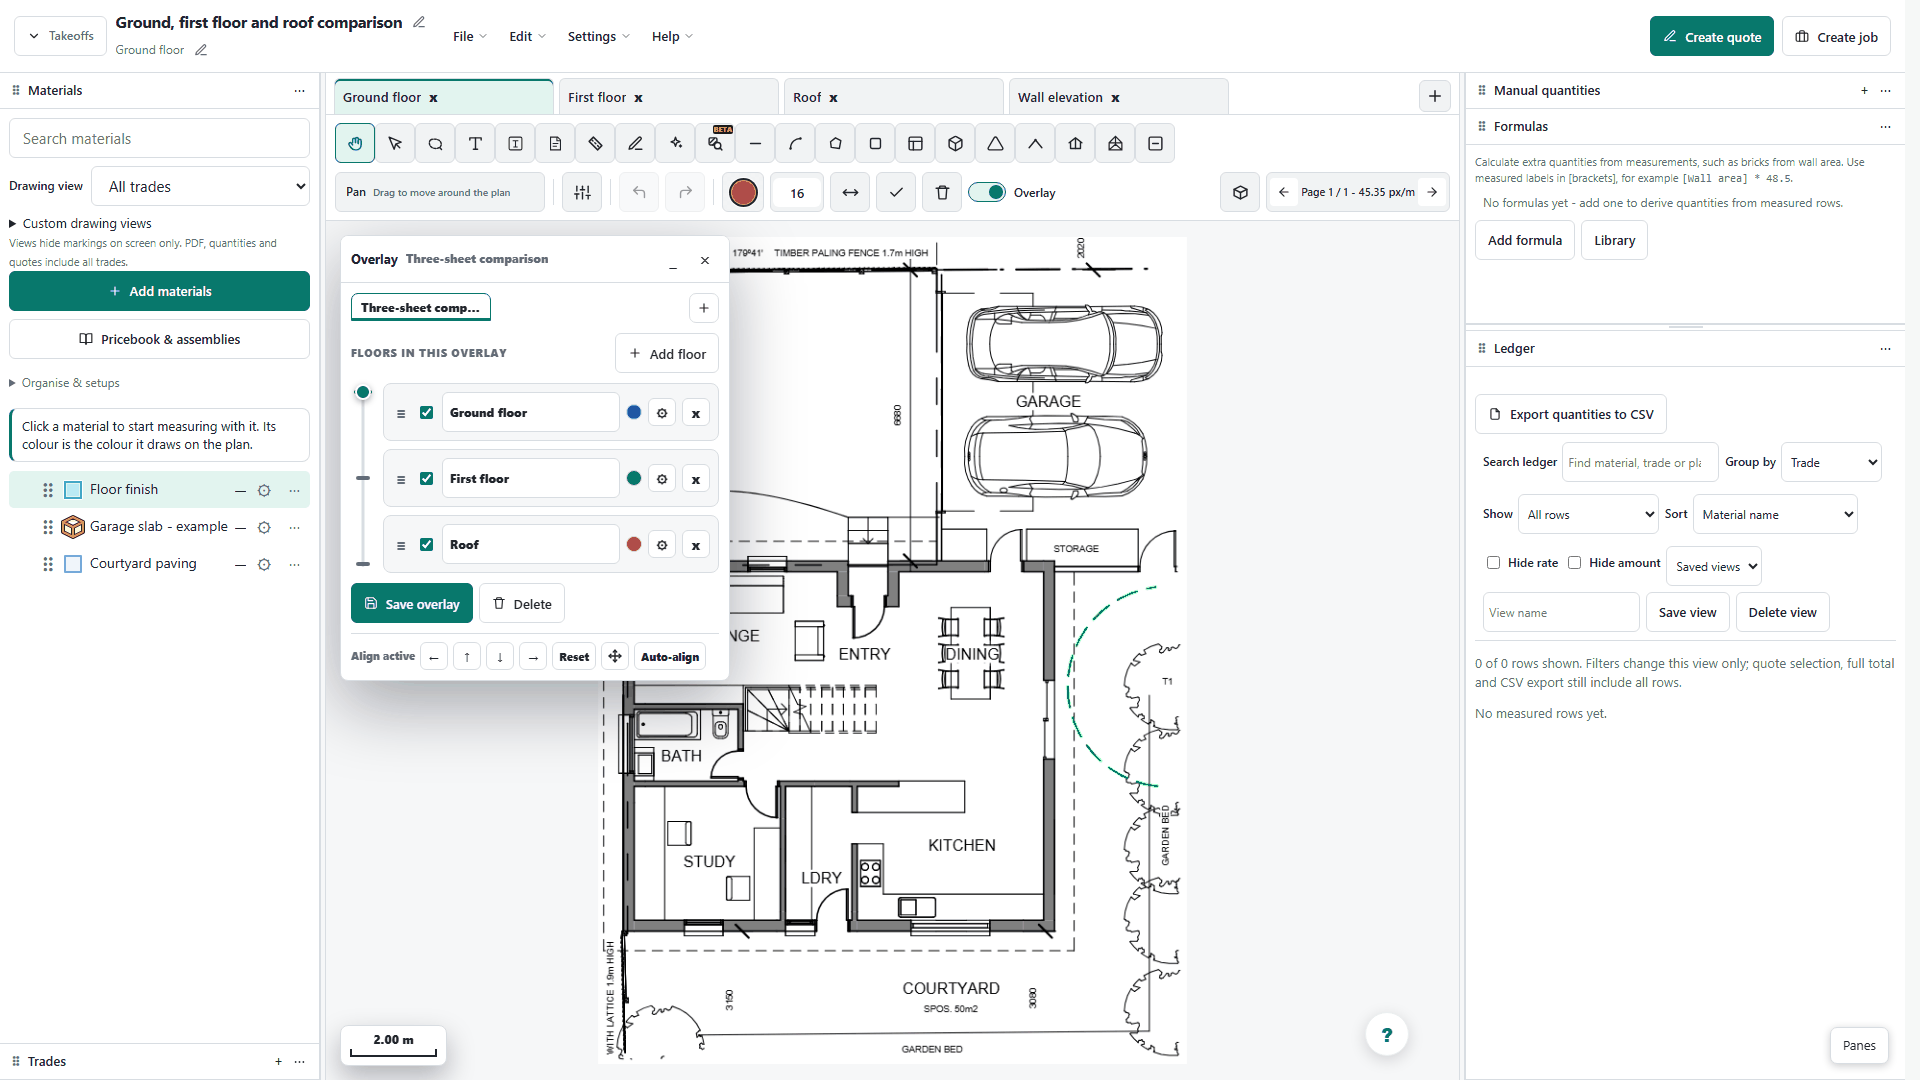
- Enable the overlay controls. Use Add overlay view and Add floor as needed, then choose the plan/page layers you want to compare and their reference sheet.
- Check common reference points across the sheets. Auto-align translates checked floors to the reference; it does not correct a wrong scale or rotation. Inspect alignment at more than one location before judging a change.
- Use layer visibility and opacity to inspect differences. Review changed geometry, deductions, formulas and linked assemblies, then update the quote or variation through the normal review process.
Worked example: If a revised paving footprint increases from 100 m² to 112 m² at the same 0.15 m depth, the geometric volume increases from 15 m³ to 16.8 m³: a 1.8 m³ difference before allowances. Remeasure the changed footprint; the overlay itself is not a priced variation.
Check before quoting: Different floors are not automatically revisions of the same scope. Confirm which sheets are being compared and retain the assumptions behind any quantity or price change.
Ready to measure the real job?
Start with the plan identity and page scale. If those two facts are right, every correction, material, price and quote line remains traceable to the drawing.